Challenge Mode

Challenge Mode is a special gamemode in Enter the Gungeon, activated by speaking to Daisuke in The Breach and spending 6 ![]() . Daisuke himself can be found in the upper right corner of the Breach, in the same room as the Sorceress, after being rescued from a Cell in the Gungeon.
. Daisuke himself can be found in the upper right corner of the Breach, in the same room as the Sorceress, after being rescued from a Cell in the Gungeon.
While Challenge Mode is active each combat room within The Gungeon will be affected by 1-3 randomly chosen gameplay modifiers. The number of modifiers per room increases the deeper the player ventures into the Gungeons Chambers. Bosses in the Hollow and Forge have special unique modifiers that increase their difficulty.
After 30 failed attempts at Challenge Mode, Daisuke will lower the cost of activating the mode to 1 ![]() . Additionally, this will unlock Chaos Bullets if they have not already been unlocked.
. Additionally, this will unlock Chaos Bullets if they have not already been unlocked.
Double Challenge Mode
Defeating the High Dragun with Challenge Mode enabled unlocks access to Double Challenge Mode, a harder version of the mode with twice the number of modifiers per room. Double Challenge Mode can be accessed by speaking to Daisuke again after Challenge Mode has already been activated and paying him a second fee.
Double Challenge Mode has no associated unlocks, as Daisuke readily informs the player.
Modifiers
When entering a new room, time breifly slows to allow the player ample opportunity to read and comprehend the current modifiers before combat begins. Only rooms containing enemies will gain modifiers.
| Icon | Name | Boss Valid | Effect | Exclusive With |
|---|---|---|---|---|

|
Adrenaline Rush | Increases the game speed by 2.5% additively each time the player dodge rolls, up to a max of 150% game speed. In boss rooms, the game speed is only increased by 1% additively with each roll, and maxxes at 130% game speed. Game speed modifiers are removed when the room is cleared. | ||

|
Blobulin Rancher | Player projectiles that are destroyed upon collision with walls or obstacles will spawn hostile Blobulins. Piercing projectiles will not spawn a Blobulin so long as they have passed through an enemy before hitting a wall.
|
||

|
Cursed Ceramics | Spawns cursed pots randomly around the room, which can be destroyed. Standing near a pot will build the player's curse meter, increasing their
|
||

|
Dark Was The Night | Darkens the room and adds a cone of light to the player's vision. Certain enemies or objects have glowing parts that make them stand out in the darkness. | ||

|
Don't Blink | Darkens the room and adds a cone of light to the player's vision. Certain enemies or objects have glowing parts that make them stand out in the darkness.
Enemies within the players cone of light are continually stunned and unjammed, however all enemies outside of the cone of light are jammed.
| ||

|
Explosive Pyre | Enemies in the room explode when killed.
| ||

|
Final Attack | Enemies release bullets in all directions upon death.
| ||

|
Ghost of the Shell | Slain enemies have a 50% chance to return as Hollowpoints.
|
||

|
Gorgun's Gaze | The Gorgun's eyes will periodically appear in random locations and send out a petrifying wave which prevents the player from firing their weapon. The wave can be avoided by dodge rolling through it or looking away from it.
| ||

|
Gull's Revenge | Causes rockets like those fired by the Gatling Gull to rain down periodically at random locations near the player. This can damage enemies. | ||

|
Gun Queue | Prevents the player from manually switching guns. Upon fully emptying a magazine, reloading, or waiting about 30 seconds, the next weapon in the player's inventory is automatically switched to.
This disables dual wielding synergies for the duration of the room, such as
| ||

|
Hammer Time | Spawns a Dead Blow that persists for the rest of the room, attacking the player. | ||

|
High Stress | Taking damage sets the player to half a heart for the next 5 seconds. Effectively means that taking damage twice in quick succession is almost always fatal. | ||

|
Last Bullet Standing | One random enemy in the room is rendered invulnerable until all other enemies in the room have been slain. This invulnerable enemy is indicated with a
|
||

|
Long Live The King | One random enemy in the room is marked as 'King'. All other enemies in the room are invulnerable until the King is slain. The king is indicated with a
|
||

|
Poison Pursuit | A trail of poison goop follows the player for the duration of the room. This poison can afflict enemies.
| ||

|
Pot Shots | Minor breakable objects fire a bullet towards the player upon being destroyed.
| ||

|
Rat's Revenge | Places flame traps at random positions throughout the room, which periodically produce bursts of damaging flame on a consistent timer. These traps permanently disable once the room is cleared.
| ||

|
Shockwave | Periodically, rings of bullets linked with electricity will appear in room and expand outwards. Touching the bullets or the electricity will damage the player.
| ||

|
Thermal Clips | Upon reloading an empty magazine, a pool of fire appears at the player's feet.
| ||

|
Unfriendly Fire | Player bullets that hit walls will ricochet and turn into hostile enemy bullets. These hostile bullets can hit both the player and enemies.
| ||

|
Zone Control | Spawns multiple supply crates in the room. The player can only fire their gun while standing within a marked zone around the supply crate. While standing in the zone, the area of effect VFX of all supply crates will begin to fill out from the center, as a form of progress meter. Once the circles are fully filled, all crates will disappear, and the player will be allowed to fire freely.
|
Unique Modifiers
Bosses in the Hollow and the Forge have special modifiers that modify their attack patterns. These modifiers are unique to each boss, and always appear on that bosses fight.
| Icon | Name | Boss | Effect |
|---|---|---|---|

|
Something Wicked | High Priest | Simple candle enemies appear randomly in the bossroom throughout the fight. These candles do not attack the player, but leave a pool of fire goop when slain. This fire is special, and does not dissipate until the High Priest has been defeated.
|

|
Extremely Bad Chess | Kill Pillars | Large rectangular patches of poison goop periodically appear in a checkerboard pattern on the floor throughout the fight. |

|
Night's Watch | Wallmonger | Two invincible Sniper Shells appear on top of the Wallmonger, periodically firing at the player throughout the fight.
|

|
Dragun Rage | High Dragun | Makes all of the Draguns attacks much more difficult:
Dragun Rage is always accompanied by High Stress. |
Related Unlocks
 Chance Bullets - Reach the Black Powder Mine with Challenge Mode enabled.
 Chaos Bullets - Defeat the High Dragun with Challenge Mode enabled, or fail 30 attempts at Challenge Mode.
- Double Challenge Mode - Defeat the High Dragun with Challenge Mode enabled.
Notes
- The Elevator Room in the Breach is boarded off while Challenge Mode is active, preventing access to Shortcuts.
- If enemies spawn into a previously empty room by using Lament Configurum, the Drill, or a Challenge Shrine, modifiers will activate. Gun Fairies that spawn from broken pots when no other enemies are present will as well.
- Each wave spawned by Drill will have a different set of modifiers, even if multiple happens in the same room.
- Each phase of the Lich boss fight will have 3 random modifiers instead of a unique one.
Trivia
- Blobulin Rancher is a reference to the game Slime Rancher.
- Cursed Ceramics is a reference to Curse Jars from Dark Souls II.
- Explosive Pyres is a reference to the game Destiny.
- Ghost of the Shell is a reference to the anime Ghost In The Shell.
- High Stress's effect and icon are a reference to the game Darkest Dungeon.
- Extremely Bad Chess is a reference to the game Really Bad Chess.
- Don't Blink is a reference to a Doctor Who episode.
- Thermal Clips is a reference to the Mass Effect series.
- Night's Watch is a reference to the Night's Watch who patrol the great Wall in George R.R. Martin's A Song of Ice and Fire, and its TV show adaptation Game of Thrones.
- Dark was the Night is a reference to the song "Dark was the Night, Cold was the Ground" by Blind Willie Johnson.
- Hammer Time is a reference to the catchphrase "Stop, Hammer Time" in the song "Can't Touch This" by MC HAMMER.
- Something Wicked is part of a quote from Shakespeare's Macbeth.
- Dragun Rage may be a reference to the Pokémon move Dragon Rage.
Gallery
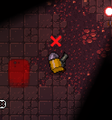
A Bullet Kin made invulnerable by the
 Last Bullet Standing modifier.
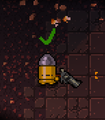
The same Bullet Kin, now vulnerable after all other enemies in the room have been slain.

