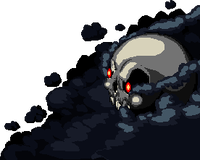
Black Powder Mine
| Black Powder Mine | |||||
|---|---|---|---|---|---|
| Chamber 3 | |||||
| |||||
| Secret Exits: | Resourceful Rat's LairETG | ||||
| Enemy Health Scale: | 160%ETG 130%XTG | ||||
| Item Cost Scale: | 140%ETG 140%XTG | ||||
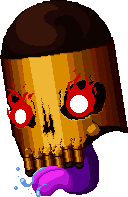
| Bosses: | Mine FlayerETGHoTG CannonbalrogETG | ||||
| Music Tracks:
Black Powder Stomp ETG | |||||

The Black Powder Mine is the third chamber of The Gungeon in all games in which it appears.
As the name suggests, it is a series of caverns and mineshafts where gunpowder and other compounds are extracted from the stone. Minecart tracks wind back and forth through the tunnels, and lakes of dangerous acid can be seen plentifully.
Unique Mechanics ETG
Acid
Some rooms in the mines contain streams and puddles of acid on the ground, easily identified by its yellowish hue. This acid acts like an accelerated poison goop, harming the player if they stand on it for too long. Enemies are immune to this poison effect.
If an acid puddle is covered with another goop, such as water, it will negate the effect of the acid while the goop is present. This means that water guns like the Mega Douser are an effective solution for rooms with tricky poison patches.

Minecarts
Main Page: Minecarts
Minecart rails and minecarts can be found in several rooms throughout the mines, used for combat, transport, and decoration. Several enemies such as Bullet Kin can hop into Minecarts and use them for combat.
Oil Sconces
Some rooms in the mines use oil-filled sconces for lighting as opposed to torches. When broken by a bullet, these sconces leave a pool of flammable oil goop on the ground, which can be ignited by fire or explosions.
Layout ETG
The Black Powder Mine follows a standard layout, with a Shop and Elevator Maintenance Room. The floor is entered via a standard elevator.
Points of Interest
Minecart Gauntlet ETG

If the Arcane Gunpowder has not yet been delivered to the Blacksmith, the mines will always contain a large room consisting mostly of a huge pit, with skulls and floating candles scattered around. Several minecarts are visible floating over the abyss. The Arcane Gunpowder is present at the far end of this room, across the gap.
To reach the Arcane Gunpowder, the player must ride the flying minecarts over the pit, utilising the ability to dodge roll out of and into minecarts to leap from cart to cart and eventually reach the other side.
The Arcane Gunpowder itself is seated on a single pedestal at the far end of the pit, surrounded by explosive barrels. Detonating these barrels has no effect on the powder. One last minecart is parked on this platform, which takes the player all the way back to the beginning of the gauntlet for simple egress.
Notes
- Wax Wings, Jetpack, Ring of Ethereal Form, Balloon Gun, Cat Bullet King Throne and other forms of flight allow the player to skip the gauntlet entirely and fly straight to the Arcane Gunpowder.
- This room is always a dead end.
- Secret Rooms cannot be connected to this room.
Rat Room ETG

If the player has delivered all four bullet components to the Blacksmith and constructed the Bullet That Can Kill The Past, one combat room in the mines will be randomly chosen to harbor a secret trapdoor each run, becoming a 'rat room'. This trapdoor is hidden, and must be dusted off via walking over it, using a blank, or spraying it with water from guns such as the Mega Douser.
What room the 'rat room' is changes each time the Black Powder Mine is entered.
When fully dusted off, the lock holding the trapdoor closed becomes interactible, and the player may spend a key to open it. Falling down this trapdoor takes the player to the Rat Tunnel.
The only indicator of which room has become the rat room is the presence of three harmless rat entites, which wander aimlessly around the room. These rats are not required for room clear, do not harm the player unless they are jammed, and may be shot and killed. Killing these rats may prove detrimental, as it can be hard to relocate the rat room later, especially if the rats corpses despawn.
Notes
- While walking over the concealed trapdoor, the players feet will kick up extra dust to help indicate the position of the trapdoor.
- This room will be marked on the map with the symbol
 , but only after the trapdoor has been revealed. No items, not even the Gungeon Blueprint, will reveal the trapdoor on the map before it is manually discovered.
 - Walking over the trapdoor will still dust it off, even if the player is flying.
- If the player teleports while simultaneously falling into the trapdoor, the game will act as if they fell into a regular pit, dealing 1 damage to them and respawning them beside the trapdoor.
- It is possible to softlock a run by using the trapdoor in the rat room. If the player opens the trapdoor before killing all enemies in the room, leaves to the Rat Tunnel, teleports out of the Rat Tunnel, and teleports again to overwrite their last teleport return, the rat room enemies will still be alive. This prevents the room from unsealing, potentially blocking the players ability to progress.
- The Bloodied Scarf can allow the player to teleport back into the sealed rat room, averting the softlock.
- Explosive items and guns may also be able to damage and kill enemies through the thin hitbox of the room doors, allowing the player to clear the room from the outside, averting the softlock.
Rat Tunnel ETG

Located far away from the main map, the Rat Tunnel consists of three consecutive rooms only accessible via the Rat Room trapdoor. These rooms are fairly straightforward, serving only to further obfuscate the entrance to the Resourceful Rat's Lair.
The first room in this sequence consists of a long corridor which the player enters on the leftmost side. A ladder near the top of this starting area can be interacted with to transport the player back to the Rat Room trapdoor. The majority of this first room is taken up by a large pit, with a lone minecart track and minecart being the only way to traverse the abyss without flight.
At the end of this corridor, there is a secret wall to the north, preventing access to the second room in the sequence. This second room in the sequence is irregular in shape, and contains nothing other than a second secret wall to the north, concealing the final room.
The final room in the tunnel is shaped like the head of the Resourceful Rat, and contains a large circular grate at its center, sealed with a large yellow lock. Using the Gnawed Key can open this lock, allowing the player to fall down the grate and taking them to the Resourceful Rat's Lair.
Notes
- The minecart in the main tunnel is deceptive, as riding it will surreptitiously teleport the player backwards multiple times in order to make the minecart ride appear far longer than it actually is. This only occurs if the minecart is ridden, however, meaning that walking along the minecart rail is, counterintuitively, much quicker.
- The secret walls concealing the second two rooms of the tunnel are identical to the secret walls used to conceal Secret Rooms, meaning that any method able to open normal Secret Rooms can also open these walls.
- This includes, but is not limited to, Blanks, Blank Bullets, Elder Blank, Lil' Bomber, Bomb, Blank Companion's Ring, and Composite Gun.
- The blank triggered upon losing Armor can also open these secret walls, with the first one being trivially simple to trigger by throwing yourself into the pit. The second secret wall is more difficult to trigger with armour, as there are no damage sources in the second room. This means that in order to take damage here, the player must bring their own method of self damage, such as an item or gun that leaves damaging goop.
 Bug - Bloodied Scarf allows the player to teleport past these secret walls without breaking them, accessing the rooms beyond for free- however this will not reveal those rooms, forcing the player to navigate to the key grate blindly.
- The Gnawed Key lock can only be opened by the Gnawed Key, meaning that other methods of opening locks such as Trusty Lockpicks, AKEY-47, or Shelleton Key will not work.
Bosses
Enter the Gungeon
|

|

|
|
|
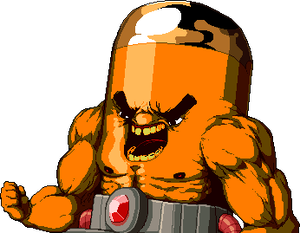
| Cannonbalrog "Guns in the Deep" |
Treadnaught "100% Weapon" |
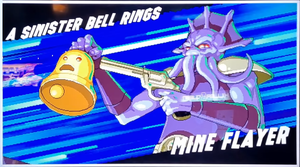
Mine Flayer "Sinister Bell" |
Door Lord (Secret) "Mimic Master" |
Blockner (Secret) "The Betrayer" |
Exit the Gungeon
|

|
|
| Low Priest "Blast From The Past" |
Bolt Python "Electric Steel" |
Mutread Head "Bare Arms" |
Enter the Gungeon: House of the Gundead
|
| Mine Flayer "A Sinister Bell Rings" |
Enemies
Enter the Gungeon
| Icon | Name | Description |
|---|---|---|
| Bullet Kin | Slowly walks towards the player, firing bullets. | |
| Bandana Bullet Kin | Slowly walks towards the player, rapidly firing bullets. | |
| Veteran Bullet Kin | Slowly walks towards the player, firing bullets and predicting the player's movements. | |
| Tanker | Slowly walks towards the player, rapidly firing bullets. | |
| Shroomer | Slowly walks towards the player, firing two bullets in a V shape. | |
| Minelet | Slowly walks towards the player, firing bullets. Occasionally hides under its hard hat, temporarily deflecting bullets, then pops out and releases bullets in all directions. | |
| Red Shotgun Kin | Slowly walks towards the player, occasionally firing a tight spread of 5 bullets. Has a chance to fire 6 bullets in all directions upon death. | |
| Blue Shotgun Kin | Slowly walks towards the player, occasionally firing a wide spread of 5 bullets quickly followed by a wide spread of 4 bullets. Has a chance to fire 6 bullets in all directions upon death. | |
| Veteran Shotgun Kin | Slowly walks towards the player, occasionally firing a V-shaped spread of 5 bullets and predicting the player's movements. Fires many bullets in all directions upon death. | |
| Keybullet Kin | Runs away from the player and disappears if not killed. Turns into a key upon death. | |
| Sniper Shell | Periodically aims at the player with a red laser, then fires a single high-speed bullet. | |
| Professional | Periodically aims at the player with a green laser, then fires a single high-speed bullet that explodes into bullets in all directions upon impact. | |
| Hollowpoint | Floats towards the player, rapidly firing bullets. Periodically disappears and reappears elsewhere in the room. | |
| Bombshee | Follows other enemies around, frequently emitting a short-ranged shriek that destroys the player's bullets. If all the other enemies die, the Bombshee will launch itself at the player, exploding on contact. | |
| Rubber Kin | Attempts to launch itself towards the player, knocking the player back upon contact. Cannot deal direct damage to players. | |
| Tazie | Launches itself towards the player, dealing damage upon contact. | |
| King Bullat | Periodically fires bouncing bullets in all directions. Spawns several Bullats and Shotgats upon death. | |
| Pinhead | Walks towards the player and explodes upon death. IF the player gets too close, it will leap towards the player and explode. | |
| Nitra | Walks towards the player and creates a line of explosions upon death. If the player gets too close, it will leap towards the player and detonate itself. | |
| Blobulon | Moves towards the player and attempts to deal contact damage. Splits into two Blobuloids upon death. | |
| Blobuloid | Moves towards the player and attempts to deal contact damage. Splits into two Blobulins upon death. | |
| Blobulin | Quickly moves towards the player and attempts to deal contact damage. | |
| Poisbulon | Moves towards the player, leaving a trail of poison creep. Splits into two Poisbuloids upon death. | |
| Poisbuloid | Moves towards the player, leaving a trail of poison creep. Splits into two Poisbulins upon death. | |
| Poisbulin | Quickly moves towards the player, leaving a trail of poison creep. | |
| Skusket | Has two lines of bullets orbiting it. Slowly floats towards the player, firing skulls that home in on the player and split into 6 bullets upon being destroyed. | |
| Gigi | Flies towards the player, periodically spitting an egg that releases a swarm of bullets towards the player. | |
| Muzzle Wisp | Dashes three times in random directions, then releases a ring of flaming bullets. Leaves behind a patch of fire upon death. Sets the player on fire upon contact. | |
| Cubulon | Frequently fires bullets in all directions in a diamond shape. | |
| Chance Kin | Runs away from the player and disappears if not killed. Turns into a !-cube which drops a random pickup upon death. | |
| Apprentice Gunjurer | Fires bullets in a variety of rotating shapes, such as a square, circle, or X. Occasionally disappears and reappears elsewhere in the room. | |
| High Gunjurer | Fires large rings of bullets at the player. Occasionally disappears and reappears elsewhere in the room. | |
| Gunsinger | Buffs an enemy in the room, increasing their health and speed. They will cancel their spell and run away if the player is too close or they take too much damage. | |
| Aged Gunsinger | Buffs all enemies in the room, increasing their health and speed. They will cancel their spell and run away if the player is too close or they take too much damage. | |
| Jammomancer | Jams an enemy in the room, increasing their health, speed, and damage. | |
 |
Jamerlengo | Jams all enemies in the room, increasing their health, speed, and damage. |
| Mimic | Rapidly fires bullets towards the player. Drops items and/or pickups upon death. | |
| Bullat | Launches itself at the player, dying in the process. | |
| Shotgat | Launches two projectiles in a V shape at the player, dying in the process. | |
| Grenat | Launches an exploding projectile at the player, dying in the process. | |
| Spirat | Launches itself at the player, dying in the process. Predicts the player's movements, and can reposition itself several times before hitting walls. | |
| Coaler | Occasionally fires bullets at the player. Catches on fire upon taking damage, running around erratically and sending flaming bullets out in random directions. | |
| Gat | Bounces around the room and deflects bullets. Occasionally opens up to fire three spreads of four bullets towards the player. | |
| Det | Periodically fires four lasers in a + or × formation. Explodes upon death. | |
| Gunzookie | Periodically spits up bubbles that, upon popping, fire a bullet that predicts the player's movements. | |
| Gunzockie | Periodically spits up four bubbles that, upon popping, fire a bullet that predicts the player's movements. | |
| Bullet Shark | Charges towards the player, releasing bullets to the sides of itself. | |
| Chancebulon | Fires random attacks from other Blobulon enemies, along with groups of bullets that look like dice. Has a chance to fire multiple attacks at the same time, and has a chance to die instead of attacking. | |
| Misfire Beast | Camouflages itself and creates projections that attack the player with bullet whips. | |
 |
Gun Nut | Periodically strikes the ground with its sword, releasing a wide 90 degree arc of bullets towards the player. Can only aim in the eight compass directions. |
| Fungun | Periodically releases clouds of bullets. Leaves a small pool of poison creep upon death. | |
 |
Spogre | Periodically releases large clouds of bullets. Releases a smaller cloud of bullets upon death. |
| Gripmaster | Hovers over the player and attempts to grab them. If the player is successfully grabbed, it will shoot the player to a previously cleared room, which will be reset and have all enemies respawned. Automatically dies if all other enemies in the room are killed. | |
 |
Phaser Spider | Fires large web-shaped sprays of bullets at the player that leave slowing cobwebs on the floor. Frequently burrows into the ground and reappears elsewhere in the room. |
 |
Killithid | Summons portals around the room that fire bullets towards the player. Occasionally splits into three copies of itself, two of which are illusions. |
 |
Tarnisher | Sinks into the floor and chases the player. If it successfully catches the player, it will deal damage, partially drain the current gun's ammo, and reduce the magazine size of all of the player's guns until they pick up ammo. |
 |
Shambling Round | Has three stages that it progresses through as it takes damage. In its first stage, it fires rings of bullets in all directions. In its second stage, it rapidly alternates between firing bullets out of its left and right sides. In its third stage, it sprays numerous bullets in all directions. Upon death, it leaves behind a cap that explodes after a short delay. |
 |
Shelleton | Slowly walks towards the player, frequently firing two wide bursts of bullets at the player. Occasionally fires a laser at the player. Collapses upon death, and will revive if not destroyed after a short period of time. |
Notes
Gallery
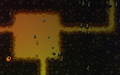
A stream of acid.

See also
| The Gungeon | |||||||||||
|---|---|---|---|---|---|---|---|---|---|---|---|
| The Breach | Keep of the Lead Lord | Gungeon Proper | Black Powder Mine | Hollow | Forge | ||||||
| Secret Chambers | |||||||||||
| Oubliette | Abbey of the True Gun | Resourceful Rat's Lair | R&G Dept. | Bullet Hell | |||||||